Showing posts with label Homemade Recipes.Organic Recipes. Show all posts

Saturday, March 12, 2016

Fresh Homemade Mayonnaise


Mayonnaise is one of those things I’ve been meaning to experiment with for some time.

Conventional mayonnaise and even some organic mayo is usually made with canola oil, which is produced from the rapeseed plant, which is a part of the mustard family. It works well as an industrial oil, not a food, and has been used in candles, soaps, lipsticks, lubricants, inks, biofuels and even insecticides. Canola oil is also geneticically modified...it’s for these two reasons that I recommend you switch to healthier oil alternatives.

You can mix the ingredients with a food processor, a blender, or an immersion blender.

The secret to successful emulsification is to pour the oil in slowly; it should take minutes, and start with only the thinnest stream.

Another trick that helps to get nice, spreadable mayonnaise is to blend it for several minutes, way longer than you might think necessary, until it's nice and thick. So, blending as you go, slowly pour up to 1/4 of the oil in with the eggs. Then stop adding oil and just blend until emulsification is obviously happening and the mixture is thick. Then add the rest of the oil. Never rush it, especially if you are just learning how.

Blend 3 eggs until creamy (use organic fresh eggs)
Ever so slowly, trickle in 2 c olive oil
Blend until soft peaks form, several minutes if needed
Add 2 cloves garlic
1 t sea salt
2 tb  organic apple cider vinegar

Blend well and place in jar. Use within 3-5 days, or proceed with fermentation: Cap tightly and leave at room temp, out of direct light, for about 7 hours. This will preserve it for about 3 weeks.


Please leave your comments below and tell me how you liked this recipe!

Enjoy!

Laurel XOXO

Sunday, March 6, 2016

The Best Organic Cinnamon Rolls!


There are hundreds of recipes out there and they might be good, but these are better than any others I’ve tried. Everyone seems to love the soft, gooey wonder of cinnamon rolls especially when they are warm and fragrant from the oven.  It turns out that they are not too hard to make at home.  Once the dough is made, you just need to roll it out, spread the filling, roll it up and slice them.  Yes, it is more work than just buying them at your local Cinnabon store, but homemade cinnamon rolls are so good that they are worth a little work!

Obviously cinnamon rolls are not high nutrition part of your daily diet, but when eaten infrequently and made with quality ingredients like organic, pastured butter, raw sugar and organic flour, they are much healthier than store bought cinnamon rolls.

Ingredients:

Dough

¼ ounce yeast package

½ cup warm spring water

½ cup organic milk

¼ cup organic sugar

1/3 cup organic butter

1 tsp sea salt

1 organic egg

3 ½ all organic all-purpose flour


Filling

½ cup melted organic butter

½ cup organic sugar

¼ cup organic brown sugar

2 tbsp ceylon organic cinnamon

½ cup organic pecans


Honey Glaze

2 tbsp organic butter

1 cup organic raw honey

1 tsp organic vanilla

1/8 cup hot spring water

Directions:

*Preheat oven 350 degrees

1. In a small bowl mix the yeast with the warm water until dissolved. In a large bowl combine milk, sugar, melted butter, salt, and the egg. Once everything in mixed into a creamy sauce, add in flour slowly until everything is smooth, then add in the yeast water. Knead the dough on a floured surface for 8 minutes and place in a well greased bowl and cover until for 1 ½ hours until the dough has risen.

2. Mix the filling by combining the sugars and cinnamon.

3. Once dough has risen remove from bowl and layout on a floured surface. Form into a rectangle that is ¼ or so thick. Spread the melted butter from the filling onto the face of the dough and sprinkle the sugar mixture and pecans on top of the butter. Then roll into a log and cut into slices that are roughly an inch think.

4. Cover the sides of the baking pan with butter then lightly sprinkle with some brown sugar and cinnamon. Pack in the cinnamon rolls close together and let sit for 45 minutes to rise. Then place in the oven for 30 minutes.

5. To make the glaze beat the butter, vanilla and honey, while slowly adding in the water. Adjust ingredients to taste.

When the rolls are finished pull them out of the oven and pour the honey glaze over the warm cinnamon rolls and enjoy!


Laurel xoxo

Wednesday, January 14, 2015

Turmeric Face Mask Recipe for Glowing Skin, Dark Circles and More!


Turmeric beauty masks have been used across Asia for centuries. They are known in Chinese and Indian traditions, and are an element of the Ayurvedic medical system. In south Asia, they were an integral part of the bride’s wedding preparations, making her look spotless and glamorous on her big day.

Turmeric contains a phytochemical called curcumin, which can benefit the body, both inside and out.

Turmeric mask works for acne and eczema. It reduces inflammation and redness, and promotes skin healing. Due to turmeric’s anti-oxidant properties, it has been used for skin rejuvenation. It helps softening lines and wrinkles, giving the face a more youthful appearance. It is also effective with rosacea – a chronic skin condition that is characterized by redness and pimples. It eases the redness and treats this disease.

The turmeric basic face mask is easy to make and acts as a moisturizer, exfoliant and reduces redness. It brightens the skin and makes it look fresh and clean.

Here’s a recipe for a homemade turmeric facial mask:

There are many variations for the recipe, but below you will find the basic recipe. Some add chickpea flower to thicken the paste or a little bit of lemon juice which helps to lighten the skin.

Ingredients

1 teaspoon of turmeric
1 teaspoon of raw organic honey
1 teaspoon of milk (you can also use yogurt)

Put turmeric into a little bowl. Add honey (honey can be used to prepare other homemade honey face masks that you can make at home). Then add milk or yogurt. You can adjust the amount of milk to make the paste more or less thick, but make sure it’s a firm paste that will stick to your face. Turmeric is a dye and it can stain anything, so you don’t want it dripping off your face.

Face preparation

Wash your face with running water and remove all makeup. If your hair is long, tie it up at the back. Wear a T-shirt you are not too attached to, in case it gets stained.

Application of the Turmeric Face Mask

Apply the mask evenly all over your face. A spot you don’t want to miss is under the eyes, as turmeric’s anti-inflammatory properties help reduce the dark circles, which form as a result of vasoconstriction (narrowing of the vessels).

If you have any mask leftover, you can save it in the fridge for a few days and use it the next time.

Let the mask dry on your face. This means leaving it on for about 20 minutes and then washing it off with cool water. Dry your face gently with a cloth.

Repeat the mask over the course of a few days. You can do it every few weeks, depending on your needs and complexion.

Why is this mask so great?

Turmeric is a good antioxidant, and an anti-inflammatory and anti-bacterial agent. Honey is also an anti-bacterial and it moisturizes the skin well. Milk contains lactic acid, which is an alpha hydroxy acid and it exfoliates the skin. Together, these three ingredients make wonders for your skin.


Let me know how this works for you!


Thanks for reading,
Laurel ♥

Sunday, January 11, 2015

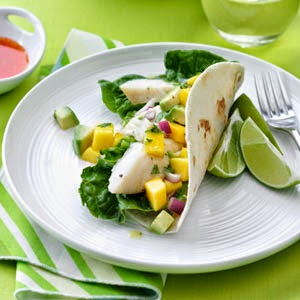
Fish Tacos with Mango Avocado Salsa


Mango Avocado Salsa Ingredients
1 large ripe organic mango
1 large ripe avocado
1 large handful of ripe organic cherry tomatoes
½ a red onion
½ bunch of cilantro
1 small serrano chili
1 tsp sea salt
Juice of 1 lime

Directions for the salsa:
Finely chop the serrano chili and the cilantro
Dice the mango, avocado, onion and cherry tomatoes
Juice the lime
Toss all of the ingredients together with the sea salt in a large glass bowl


Ingredients for the fish tacos:
4 flour tortillas
1 pound fresh salmon or halibut
2 tablespoons olive oil
1 teaspoon fresh ground pepper
Juice from 1/2 lime
1 teaspoon garlic powder
1 teaspoon chili powder

Directions for the fish tacos:
Rinse the fish with water and pat it dry with a paper towel. Cut the fish into bite-sized chunks.

Place the fish in a bowl and add the remaining ingredients. Allow the mixture to marinate for at least 30 minutes.

Place the fish in a skillet over medium-high heat. Cook for 4–5 minutes or until the fish is slightly translucent.

Heat the flour tortillas in a skillet or in the microwave for 15–20 seconds.

Layer the fish over the tortillas and add the desired amount of salsa.

Enjoy!


Thanks for reading,
Laurel ♥

Friday, January 9, 2015

Chicken with Creamy Mushroom Sauce


I've found using thighs to be easier in this type of stove top recipe—all the chicken pieces get cooked in the same amount of time, and I prefer the flavor of thighs to breasts. You could use whole chicken parts, or chicken breasts. If you use chicken breasts, watch the timing—the white meat of chicken breasts cooks faster than the dark meat of thighs.

Before you start to prep, take the chicken out of the refrigerator and sprinkle all sides with about a teaspoon of sea salt. Salting first helps draw out the flavor in meat. Let sit for at least 20 minutes to take the chill off of the chicken.

Ingredients
3 to 4 pounds grass-fed boneless/skinless chicken thighs (cut up)
1 1/2 teaspoons sea salt
1/2 cup organic rice flour for dredging
1/4 teaspoon ground black pepper
1/4 cup plus 2 Tbsp olive oil
1 Tbsp butter
1/4 cup organic chicken broth
1 small onion, chopped (about 1 cup)
3/4 pound fresh organic mushrooms, thickly sliced (I use cremini)
1 cup organic baby spinach
1 clove of garlic, minced
1 cup organic heavy cream or half & half


Directions
1. Mix 1/2 cup flour, 1/2 teaspoon of salt and a 1/4 teaspoon of pepper in a shallow bowl. Dredge the chicken in the flour mixture.

2. Heat oil in a large frying pan on medium high heat. When the oil is hot, working in batches, place the chicken pieces in the pan. The oil should be hot enough so that the chicken pieces sizzle when they are in the pan, but not so hot as to burn the chicken. You want the pieces to be lightly browned. Brown on all sides. Pour in the chicken broth and continue cooking until done.

3. Heat 2 Tbsp of olive oil in a large frying pan on medium heat. Add the onions and cook until translucent. Add mushrooms and garlic about 6-7 minutes and add the spinach and cook until spinach is wilted. Toss in the cooked onions and chicken.

4. Add the heavy cream to the chicken and mushroom mix. Lower the heat. Keep warm, but do not boil. Add salt and pepper to taste.

Serve over quinoa, rice or noodles.


Thanks for reading!
Laurel ♥


Wednesday, December 31, 2014

Easy Organic Hummus Dip


Today, I am sharing the quick easy hummus that only takes 5 minutes to make. Sometimes we're not prepared to soak chickpeas for 24 hours, then rinse, then boil and simmer, skimming the whole time.

This super easy hummus is a fantastic solution to a last minute munchie attack, and is always a crowd pleaser no matter how many times it is served. Just keep pulsing and tasting until you achieve your perfect blend.


Easy 5 Minute Hummus Dip

1 can organic garbanzo beans/chickpeas thoroughly rinsed and drained
4 large cloves garlic crushed, or more to taste
2 Tbsp organic tahini, or more to taste
4 Tbsp cold pressed extra virgin olive oil, or more to taste
8 Tbsp lemon juice, or more to taste
1/2 tsp freshly grated lemon zest (optional)
Celtic sea salt to taste
freshly ground pepper
paprika for garnish


Using a food processor or a blender (I like to use a NutriBullet) – puree the chickpeas, lemon juice, garlic, tahini, salt, and pepper. The blender will produce a smoother, finer-textured dip than the food processor. If you prefer a more rustic, chunky look, head for the food processor. Have a taste, and keep adding until you achieve your perfect blend.

Transfer to a serving bowl and chill. Grab some chips, flat bread, or veggie sticks, and enjoy!


Thanks for reading!
Laurel ♥

Sunday, December 28, 2014

Homemade Honey Caramel Recipe


I have been craving a  homemade version of the conventional store bought caramels that would be less expensive, easy to make and still have that great caramel-y taste. Caramels are my second favorite treat as my favorite is dark chocolate! You could cut these up in squares and dip them in melted dark chocolate for a double delight. Cream was used to make the creamiest texture and flavor which created similar results to the popular Caramels candy but without all the sugar. And instead of sugar, honey is the only sweetener I used to sweeten these! Caramel made from sweet, natural honey isn’t only delicious but a lot healthier than traditional candy!

Chewy, rich and decadent, you’ll find these make wonderful gifts for friends or tasty travel snacks. I think they are yummy enough to replace any candy item in your holiday candy platters or any party favor bag! Enjoy!

Honey Caramels

1 cup Organic Raw Honey
3/4 cup Organic Heavy Cream
1 1/2 teaspoons Pure Vanilla Extract
2 Tablespoons Organic Butter

Combine honey and cream in a sauce pan and bring to a boil on high heat. Turn heat down to medium. Stir occasionally while it cooks. Continue cooking until the mixture reaches soft ball stage.
Don't make the mistake of walking away from your pan...it cooks fairly fast - about 15 minutes or less.

The easiest way to do this is with a candy thermometer but since I didn't have one I just used the method of testing it in cold water until it formed a soft ball, similar to making homemade cocoa fudge.

Remove pan from the heat and immediately stir in vanilla and butter. Stir until butter is completely melted and combined.

Pour into a generously buttered 8 X 8 inch dish or smaller if you want thick large caramels. Having your dish properly buttered is important for easy removal of the caramels once set. Place in the freezer to harden for 30 minutes. Cut into squares or scoop out with a spoon and enjoy!

Keep leftovers in the fridge or freezer in an airtight container. If you are going to take these caramels with you traveling, be sure to keep them cool! They will melt in high humidity and hot temperatures and will be hard to eat.


Laurel ♥

~ Can you tell I've had a sweet tooth lately?  

Saturday, December 27, 2014

Vegetable Lasagna


This vegetable lasagna is perfect for making ahead and can easily transport to a potluck or the freezer.

INGREDIENTS
3 cups chopped organic veggies of your choice
½ chopped organic onion
2 tablespoons organic minced garlic
1 tablespoon organic olive oil
1 organic egg
2 cups fresh organic spinach
2 cups organic tomato sauce
12 uncooked organic whole grain lasagna noodles
1 cup organic mozzarella cheese, shredded

INSTRUCTIONS
1. Chop the veggies. Saute the onion and garlic in the oil over medium high heat. Add veggies and saute until tender. Set aside.
2. Whisk egg and stir in fresh spinach.
3. Pour a little sauce in the bottom of a greased 9x13 pan. Top with 4 lasagna noodles, the egg-spinach mixture, ½ of the veggies, and ¾ cup sauce. Repeat; top entire pan with noodles, remaining sauce, and mozzarella cheese.
4. Cover and bake for 40 minutes at 375 degrees. Remove foil and bake for 10 minutes more or until cheese is bubbly.
5. Check the lasagna at 30 minutes and add ¼ cup vegetable stock if the lasagna looks too dry.


Laurel ♥

Monday, December 22, 2014

Dark Chocolate Covered Pomegranate Clusters


What is there not to love about a two-ingredient recipe - especially during this joyful, but busy, time of year? With fresh pomegranate and organic dark chocolate, you can create a dazzling tray of chocolate pomegranate clusters that are sure to please your holiday crowd.

Ingredients
1 large or 2 medium pomegranates yields approx. 1 cup pomegranate arils
2/3 cup (4 ounces) Equal Exchange Organic dark chocolate

Directions
Score the pomegranate and place in a bowl of water. Break it open under water to let the arils sink to the bottom and the membrane float to the top. Pour through a colander and set the pomegranate arils on paper towels to absorb any excess moisture. Melt chocolate in a heavy-bottomed small saucepan over low-to-medium heat stirring frequently, 2 to 3 minutes. Remove saucepan from the burner. Add pomegranate seeds. Use a fork to scoop out small chocolate-covered clusters, and place each on a wax paper lined plate.  Refrigerate until chocolate is firm, about 15 minutes.

I just made some last night and they were so delicious!

Laurel ♥

Thursday, November 20, 2014

Healthy Vegetable Beef Stew


This hearty grass-fed beef and vegetable stew recipe is wonderful on a cold, snowy winter day. The richness of the beef broth is enhanced with the red wine, garlic, and herbs. The broth is so delicious that I sometimes crave a big bowl and you can add whatever vegetables you would like. For this recipe  I chose classic carrots, onions, celery, and potatoes, but you can tailor it to fit whatever tastes you like. It reheats nicely, and it’s great to have a hearty, home-cooked meal at the end of a busy day, with minimal effort!

Ingredients: 
2 pounds grass-fed stew meat
2 quarts organic beef stock
1 large organic sweet onion
5 large organic carrots
5-7 stalks organic celery
8-15 cloves of garlic
1 pound organic potatoes
1 cup red wine
1-2 tbsp. organic tomato paste
 fresh lemon
1/2 tbsp. dried thyme
1/2 tsp paprika
sea salt and black pepper
organic extra-virgin olive oil

Directions:

1.Cut your stew meat into bite-sized pieces. Set aside.
2. Chop your onions, celery, carrots, and potatoes into bite sized pieces. Set aside.
3. Mince your garlic.
4. In a heavy stock pot heat 3 tbsp. olive oil over medium-high heat.
5. Add your garlic and meat and cook until the meat is browned, careful not to burn the garlic.
6. Add your veggies and stir until the veggies are mixed in well with the meat.
7. Add the red wine and cook for 5-8 minutes to allow the alcohol to cook off.
8. Add the tomato paste and spices. Stir to combine.
9. Add your beef stock. Cover and bring to a simmer.Let simmer for 1 hour and lower the heat. After 1 hour, taste for salt and seasoning. Adjust the seasoning to suit your tastes.
10. The stew can be eaten at this point (provided the veggies are done), but honestly, it tastes best if it can simmer on super low heat for 3-4 hours before serving.

This recipe freezes nicely and makes great lunches and dinners when you’re in a hurry!


Laurel ♥

Friday, November 14, 2014

Homemade Natural Minty Mouthwash


Mouthwash is a staple just about everyone has in their home, but do you know what’s actually in the mouthwash you've been using? Unless you use a natural organic product, chances are the ingredient list is toxic. “Certain types of mouthwash increase the risk of heart attacks and stroke and are a “disaster” for health, scientists have warned.” I am referring to chlor­hexidine, an ingredient found in some mouthwashes that can kill helpful bacteria that help the blood vessels relax.

My dentist has been prescribing a medicinal mouthwash Chlorhexidine Gluconate 0.12% to me for some time now and I thought it was helping my gums and teeth until I researched this product.  I was shocked to learn how harmful it really is!  Now I'll NEVER use this mouthwash again!! This is a list of the ingredients:  11.6 % alcohol, glycerin, PEG-40 sorbitan diisostearate, flavor (which tastes terrible), sodium saccharin, and FD&C Blue No 1.   

My homemade mouthwash fights bacteria and leaves your breath minty fresh without all the toxins! Plus, this recipe is really inexpensive to make!


What’s Harmful About Store Bought Mouthwash

When I was researching about how harmful many mouthwashes are, I found one site that said that if your dentist recommends using mouthwash, you need to ask him if he even knows what's in this stuff! Good point!

Benefits Of Using This Homemade Natural Mouthwash

1. Freshens breath – One of the main reasons I like to use mouthwash is because it leaves my breath minty fresh! If I don’t have time to brush my teeth or even just want that nice clean feeling after I brush, this is a great option. All you do is take a teaspoon of this recipe, swish it in your mouth and you’re set to go! It’s easy, if you have no time and much better than grabbing one of those breath freshening mints with all those questionable ingredients.

I used peppermint in this recipe to give the minty fresh affect, but if you don’t like mint taste, you can replace it with your favorite kind of essential oil.

2. Improves Oral Health – The ingredients in this homemade natural mouthwash help fight bacteria and improve your gum health. The antibacterial and antimicrobial properties of coconut oil and peppermint essential oil help to get rid of the bad bacteria. I added a little salt to this recipe to increase the benefits even more because, just like when you do a salt water mouth rinse, the salt helps eliminate bacteria and also promotes healing of the gums.

3. Prevents Cavities – In addition to leaving your breath minty fresh, this natural mouthwash is also great because it helps prevent cavities! I added coconut oil to this recipe to boost the antibacterial, antiviral, and antimicrobial properties. Peppermint essential oil is great in this recipe because it not only eliminates bad breath, but it helps fight off bad germs and decreases dental plaque. It has great antiseptic and ant-inflammatory properties, which is why it is often added to toothpaste recipes and mouthwashes.

How To Make Homemade Natural Mouthwash

What You Need:

1/2 cup spring water
1 teaspoon organic coconut oil
2 drops peppermint essential oil (or another oil such as cinnamon, clove, or wintergreen)
Pinch of sea salt
Optional: add a drop or 2 of another essential oil, such as spearmint or tea tree oil
Optional: pinch of baking soda


Other popular mouthwash ingredients include alcohol (dries the mouth and disrupts the natural pH of the mouth), sodium saccharin (sweetener, carcinogen, linked to bladder cancer in animals), artificial colors, benzoic acid (preservative & antibacterial agent, linked to allergies, asthma), and Poloxamer 407 (a detergent, linked to high cholesterol in mice). These harmful ingredients barely touches the surface as there are a vast amount of chemical agents found in different brands of mouthwash.

Aside from the chlorhexidine and toxins discussed above, many mouthwashes have a warning label that reads like this:

Keep out of reach of children. If  accidentally swallowed, get medical help or contact a Poison Control Center right away.

I don’t like putting a product in my mouth that if swallowed requires a call to poison control! Here is my simple recipe for an all natural homemade mouthwash recipe you can make in about 30 seconds.


Laurel ♥

Friday, October 24, 2014

Delicious Coq Au Vin - Casserole of Chicken in Red Wine


Coq au Vin

Coq au Vin (literally "rooster in red wine") is probably the most famous of all French chicken dishes, and certainly one of the most delicious, with its rich red wine sauce, its tender onions and mushroom garniture, and its browned pieces of chicken with their wonderful flavor. Ideal for a party because you may prepare it completely a day or more before serving. In fact, Coq au Vin seems to be even better when done ahead so all its elements have time to steep together.

History: Coq Au Vin is a Burgundian dish, and is considered a French comfort food. The traditional recipe for Coq au Vin did not include chicken, but rather a "Coq," which is a rooster. A lot of recipes originally called for old barnyard fowl, roosters, capon (a de-sexed rooster), and old laying hens. Coq au Vin was originally considered peasant food, and the farmers would make do with what they had on hand. The red wine in the recipe was used not to mask flavor, but to allow the acids to help break down the old meat of the rooster True coq Au Vin was actually finished with the blood of the rooster stabilized with brandy and vinegar, this would help the blood not clot.

Coq Au Vin has been my favorite go to chicken recipe for many years.  The rich red wine sauce makes this dish incredibly delicious!

Ingredients

4 ounces uncured lean thick-cut bacon
2 1/2 to 3 pounds cut-up frying chicken, skin on and thoroughly dried (I used skinless boneless breasts and thighs instead)
Sea salt and freshly ground black pepper
1/2 pound carrots, cut diagonally in 1-inch pieces
1 yellow onion, sliced
1 teaspoon chopped garlic
1/4 cup cognac
2 cups red wine (Pinot Noir, Burgundy, Beaujolais or Chianti)**
1 cup organic chicken broth (I use Pacific Organic Chicken broth)
10 fresh thyme sprigs
2 tablespoons unsalted organic butter, at room temperature, divided
1 1/2 tablespoons organic all-purpose flour
1/2 pound small whole onions
1/2 pound cremini mushrooms, stems removed and thickly sliced
2 tablespoons organic virgin olive oil

* The U.S. Department of Agriculture, as well as food agencies in the United Kingdom and elsewhere, advises against washing poultry. Rinsing chicken will not remove or kill much bacteria, and the splashing of water around the sink can spread the bacteria found in raw chicken. Cooking poultry to 165 degrees Fahrenheit effectively destroys the most common culprits behind food-borne illness.


** Avoid bold, heavily-oaked red wine varietals like Cabernet.

Directions

Preheat the oven to 250 degrees F.

Heat the olive oil in a large Dutch oven. Add the bacon and cook over medium heat for 8 to 10 minutes, until lightly browned. Remove the bacon to a plate with a slotted spoon.

Meanwhile, lay the chicken out on paper towels and pat dry. Liberally sprinkle the chicken on both sides with salt and pepper. When the bacon is removed, brown the chicken pieces in batches in a single layer for about 5 minutes, turning to brown evenly. Add the cognac. Remove the chicken to the plate with the bacon and continue to brown until all the chicken is done. Set aside.

Add the carrots, onions, 2 teaspoons salt, and 1 teaspoon pepper to the pan and cook over medium heat for 10 to 12 minutes, stirring occasionally, until the onions are lightly browned. Add the garlic and cook for 1 more minute.  Put the bacon, chicken, and any juices that collected on the plate into the pot. Add the wine, chicken broth and thyme. Bring to a simmer, cover the pot with a tight fitting lid and place in the oven for 30 to 40 minutes, until the chicken is just not pink. Remove from the oven and place on top of the stove.

Mash 1 tablespoon of butter and the flour together and stir into the stew. Add the onions. In a medium saute pan, add the remaining 1 tablespoon of butter and cook the mushrooms over medium-low heat for 5 to 10 minutes, until browned. Add to the stew. Bring the stew to a simmer and cook for another 10 minutes. Season to taste. Serve hot.


Bon appétit!


Laurel ♥


Monday, July 14, 2014

Black Bean and Tomato Quinoa


Quinoa is a fast-cooking, protein-packed whole grain. It makes a perfect partner for lime-spiked black beans and fresh tomato.  Serve as a side dish for any meal...it's delicious.

Ingredients:

2 teaspoons grated lime zest
2 tablespoons fresh lime juice
2 tablespoons unsalted organic butter, melted and cooled
1 tablespoon olive oil
1 cup organic quinoa
1 (14- to 15-ounce) can organic black beans, rinsed and drained
2 medium organic tomatoes, diced
4 scallions, chopped
1/4 cup chopped fresh cilantro

Preparation:

Whisk together lime zest and juice, butter, oil, sugar, 1/2 teaspoon sea salt, and 1/4 teaspoon pepper in a large bowl.

Wash quinoa in 3 changes of cold water in a bowl, draining in a sieve each time. Place quinoa in a fine mesh strainer and rinse thoroughly, drain.

In a medium saucepan, heat a splash of olive oil over medium-high heat and add quinoa.  Cook and stir for 1 minute. Stir in 2 cups spring water and seasonings & boil rapidly. Turn heat to lowest setting, cover and cook for 15 minutes. Remove from heat and let stand for 5 minutes, covered.

Add quinoa to dressing and toss until dressing is absorbed, then stir in remaining ingredients and salt and pepper to taste.


Intuitively Yours,
Laurel ♥

Thursday, May 15, 2014

Healthy Wild Pacific Tuna Casserole

http://healthyintuitions.blogspot.com/


As I was growing up, my mom often made the usual tuna casserole for dinner.  When my mom told me she was making tuna casserole for dinner, I was disappointed because it was NOT one of my favorite meals as a kid.  These days I actually enjoy tuna casserole made my own way using only Wild Pacific albacore tuna and organic unprocessed ingredients.  

Wild Pacific albacore tuna is troll caught, high in omega 3s, low in mercury and is the healthiest tuna you can buy.  Most canned albacore tuna found in supermarkets comes from canneries and highly processed.  They cook it twice - getting rid of many natural flavors, juices and omega 3s.  As if that isn't bad enough, they also add water, vegetable broth, soy and salt.  Wild Pacific tuna is packed in its natural juices, cooked only once, retaining the natural juice and omega 3s.

Healthy Tuna Casserole -

This recipe is organic, using unprocessed ingredients and it's made without canned condensed soup!

Ingredients:

1 lb whole wheat noodles (rotini )
3 T unsalted butter
16 ozs white button mushrooms
3 cloves garlic, chopped
3/4 tsp sea salt
1/8 tsp freshly ground black pepper
1 T arrowroot powder (cornstarch substitute)
1 1/2 cups chicken stock
1 1/2 cups heavy cream
2 cans Wild Pacific albacore tuna 
2 cups frozen peas, thawed
1 cup grated cheddar cheese

Topping:

3 slices whole wheat bread
2 T unsalted butter, melted


Directions:

1) Preheat oven to 375 degrees.  Boil the pasta and drain.

2) Melt butter in saucepan over medium heat.  Stir in mushrooms, garlic, salt and pepper.  Cook mushrooms about 5-7 minutes.  Sprinkle in arrowroot powder while continuously stirring for about 30 seconds to prevent lumps.  Stir in the chicken stock and cream; simmer until sauce is thick, about 12 minutes.

3) Toss pasta, mushroom sauce, tuna, peas and cheese in a large bowl.  Season to taste with salt and pepper.  Pour into a buttered 13 x 9-inch baking dish and spread evenly.

4) Place bread and melted butter in the bowl of a food processor or blender.  Pulse until finely ground.  Evenly spread buttered crumbs over top of pasta mixture.  Bake for 30 minutes, or until bubbly and golden brown on top.


Wednesday, May 14, 2014

Simple Creamy Homemade Cottage Cheese

http://healthyintuitions.blogspot.com


In the past, I've enjoyed eating a generous scoop of cottage cheese with my favorite fruits on top as a healthy between meal snack.  But sadly, I discovered that the ingredients of common brand grocery store cottage cheese contained a list of unhealthy ingredients such as:

Cultured Fat Free Milk, Buttermilk, Nonfat Dry Milk, Cream, Salt, Citric Acid , Lactic Acid, Phosphoric Acid, Natural Flavoring, Guar Gum, Mono and Diglycerides, Xanthan Gum, Carob Bean Gum, Titanium, Dioxide (artificial color), Maltodextrin, Cultured Dextrose, Potassium Sorbate, Calcium Chloride and Enzymes

I was stunned after reading the ingredients because I had always thought that cottage cheese was a healthy snack.  I make it a point now to ALWAYS read the labels on any foods I consider buying, and I've suggested that all my readers do the same!

I made this simple creamy delicious cottage cheese with only 3 simple ingredients:

Organic Whole Milk
Organic White Vinegar
Sea Salt

This homemade cottage cheese is the easiest recipe I've ever made!


Ingredients:

2 1/2 cups of organic whole milk
1/4 cup of organic white vinegar
dash of sea salt 

Directions:

1) In large saucepan, combine the milk, vinegar and salt together.  Stir continuously to almost a boil until it begins to curdle.

2) Remove from heat and drain the curds using a cheesecloth or strainer.  Cool to room temperature.  Store in a container and refrigerate.  Makes about 1 cup.  

The end result is a delicious, light and creamy cottage cheese without any harmful ingredients.  Add your choice of fruits, herbs, veggies and enjoy!

Sunday, May 11, 2014

Happy Mother's Day! A Perfect Gift - Make Mom Breakfast in Bed

http://healthyintuitions.blogspot.com


A special gift for Mother's Day - Serve mom breakfast in bed with a personal touch to show her your love and appreciation.  Although my mom has passed away, I'll be celebrating this day by sharing with you a healthy breakfast that I would have made for my mom if she were here today - French Strawberry Crepes with a puree fruit topping.

French Strawberry Crepes

Ingredients: Batter

1 cup organic all-purpose flour or coconut flour
1 1/2 cups coconut milk or almond milk
2 organic eggs
1 T. olive oil
1/4 tsp. sea salt
1 tsp. vanilla extract

Ingredients: Puree Topping

1 cup sliced organic strawberries ( or fruit of choice)
2 tsp. raw honey


Directions:

Preheat oven to 200 degrees.

1) In a large mixing bowl lightly beat the eggs and add milk, olive oil, salt and vanilla.

2) Add the flour and whisk until smooth with no lumps.

3) In a skillet, heat a dab of olive oil on medium-low and pour about 1/4 cup of the batter to cover the bottom of the pan.  Lift skillet off the stove and swirl it around to spread the batter evenly, and place back on the stove.  As soon as the crepe forms bubbles on the top, flip over and cook the other side.

4) Place the cooked crepe in a pan in the warm oven, and repeat process until you've finished the batter.

Top the crepes with the puree topping and garnish with strawberries or your favorite fruit.


*Serve with Organic Prairie uncured bacon or turkey sausage, a glass of freshly squeezed orange juice and a hot cup of herbal tea or coffee.  

Arrange the breakfast on a serving tray with a single rose in a vase, your greeting card and serve to your mom.  She will LOVE it!!


Happy Mother's Day Mom

All my love,
Laurel ♥♥♥


Saturday, May 10, 2014

Homemade Baked Mac and Cheese Recipe

http://healthyintuitions.blogspot.com/Mom's Recipe


A favorite comfort food in my family was Mom's Homemade Baked Mac and Cheese recipe.  She always made it from scratch and it was so delicious.  Obviously much more superior than the boxed version, which tasted soooo bad!  Do I dare mention this company's name?  You know who they are...it's Kraft, the company that makes their so-called healthy meals for kids.  The latest news about boxed Kraft Mac and Cheese is that it now has warning labels on the back of the package.  It contains artificial food dyes, such as Yellow #5 and Yellow #6 in the powdered cheese.  Kraft's pasta is made from (GMO) genetically modified wheat. 

I've made Kraft's Mac and Cheese in the past for an easy meal, but I'm happy that I never made it a habit because now I know how harmful it is to your health.

My mom's recipe for baked mac and cheese is easy to make, and I've updated it with all organic ingredients, but it is still her basic recipe.


Homemade Baked Mac and Cheese Recipe

Ingredients:

  • 5 T. organic unsalted butter, divided
  • 1/2 cup organic bread crumbs
  • 1/4 cup organic shredded Parmesan cheese
  • 1 lb. organic elbow pasta
  • 4 T. organic flour
  • 4 cups organic 2% milk 
  • 6 cups grated organic white cheddar cheese
  • sea salt and pepper to taste

Preparation:

1)  Preheat oven to 400 degrees.  Melt 1 T. butter and combine with bread crumbs and Parmesan cheese in a small bowl.  Set aside.

2)  Cook pasta per package directions, drain, and return to cooking pot.

3)  In a large saucepan, melt remaining butter over low to medium heat.  Add the flour and whisk until golden.  Add milk; continue whisking and cooking until sauce thickens slightly.  Add grated cheese, whisking until cheese melts into sauce.  Add salt and pepper to taste.

4)  Pour sauce over pasta and stir.  Pour mixture into a 4-quart baking dish and sprinkle with breadcrumb mixture.

5)  Bake 25-30 minutes until lightly golden and bubbling.  

Serves 6-8 


Friday, May 2, 2014

Fresh Pineapple Upside Down Cake

http://healthyintuitions.blogspot.com


Occasionally I get a craving for something warm out of the oven that's delicious and sweet. Yesterday, I went shopping and bought a fresh pineapple and thought about making a Pineapple Upside Down Cake.  I'm not a huge sweets fan so to speak, but I love desserts with fresh fruit in most recipes I've made in the past.  I found my recipe for this moist fresh Pineapple Upside Down Cake, since I already had the pineapple and had a craving for a warm slice of this delicious dessert.  I have to say it was a bit of work making it, but worth every bite!

Pineapple Upside Down Cake is a sweet American treat from the 1920's and '30's.  It was popular in the '50's  and '60's, and is again gaining in popularity.  Cooking a cake upside down is an old technique that started centuries ago when cakes were cooked in cast iron skillets and made with many different fruits until James Dole's engineers invented a machine in 1911 to cut pineapples into nice rings.

I don't use canned pineapple because nothing tastes as good as fresh pineapple!  I've also omitted the maraschino cherries because they are toxic.  Maraschino cherries were once cherries, but then are LITERALLY BLEACHED clean of their color and flavor using sulfur dioxide, calcium chloride and several other "food-safe bleaching agents", then re-dyed in Red #4 and flavored with artificial chemicals.  Almost every recipe for Pineapple Upside Down cake includes maraschino cherries, but now I would never eat them again.  It might make the cake look more colorful, but why would you want to purposely eat poison?


Recipe for Fresh Pineapple Upside Down Cake - 

Ingredients:

Pineapple Topping:

5 T. organic butter, melted
3/4 cup organic brown sugar
1/4 cup fresh pineapple juice
5-7 fresh pineapple rings or sliced pieces

Cake Batter:

1 1/2 cups organic all-purpose flour
1/2 cup organic cane sugar or coconut cane sugar
1/2 tsp. sea salt
2 tsp. baking powder
3 organic eggs
1/2 cup fresh pineapple juice
1/2 tsp. vanilla extract
7 T. butter, melted


Directions:

1. Preheat oven to 400 degrees.

2. Melt 12 T. of butter and coat the inside of a 9-inch round cake pan with a bit of the butter.

3.  Mix 5 T. butter, brown sugar and 1/4 cup pineapple juice.  Place mixture in the bottom of the cake pan.  Arrange pineapple rings or sliced pieces on the brown sugar mixture.  Set pan aside.

4. Stir together flour, salt, cane sugar and baking powder.

5. Beat the eggs and stir in remaining 1/2 cup pineapple juice, vanilla, and melted butter.  Add this mixture to the flour mixture and fold in to blend.  Pour batter over the top of the pineapples.

6. Bake in oven until cake springs bake when lightly touched, about 30 minutes.

7. Let cake cool in pan for 10 minutes.  Cover pan with plate and invert so pineapple side is facing up.


Serve with a dollop of whipped cream.  ENJOY!


Thursday, May 1, 2014

Whole Wheat Tortilla Veggie Wrap

http://healthyintuitions.blogspot.com


Tortillas may date back to the Aztecs in Mexico, but today's wraps are a modern day nutritional miracle.  Whether you use them to make sandwiches, salads or wraps, they are a delicious convenient source of whole grains and can even help you cut back on bad carbs and lose weight.  They are healthier than bread and a good choice for dieters as long as you purchase the organic whole grain tortillas without the added preservatives.

I stopped eating conventional bread years ago because it made me feel bloated and full without adding any nutritional value to my diet.  Supermarket breads always contain processed sugar which you should be eliminating from any foods that you eat.  

This veggie wrap is a salad you can eat with your hands.  Pack it for your work lunch or on the go.  


Ingredients:  Organic -

1 can (15 oz) black beans, drained and rinsed
2 tsp. extra virgin olive oil
1 tsp. ground cumin
1/4 tsp. chili powder
1/2 tsp. sea salt
6 whole wheat tortillas (10-inch diameter)
1/2 cup tomatoes, diced
1 cup organic cheddar cheese, grated
6 large romaine lettuce leaves
1 avocado, sliced


Directions:

1. Mash beans, and combine with olive oil, spices and sea salt in a medium bowl.

2. Spread 2 T. bean mixture on EACH tortilla halfway between the center and bottom edge.  Top with 1-2 T. tomato, cheese, avocado;  cover with romaine lettuce leaf.

3. Fold sides of tortilla over filling and roll from bottom to form a log.  Cut wraps in half diagonally.

Serves 6 -


Friday, April 25, 2014

Organic Baby Spinach and Mushroom Quiche


This organic baby spinach and mushroom quiche is one of my favorite recipes.  You can make it for breakfast, brunch, or even for dinner.  Most of us don't have time to make a pie crust from scratch, so I use a Wholly Wholesome Organic 9" pie shell for this recipe.  Wholly Wholesome pie shells are delicious and easy to use, and will save you time in the kitchen.


Ingredients:

One Wholly Wholesome 9" pie shell
2 T extra virgin olive oil
1 medium onion (sliced)
1 1/2 cups Crimini mushroom caps (sliced)
3 cups firmly packed baby spinach (fresh)
1 clove garlic minced (1 tsp)
3 large eggs
3/4 cup coconut milk (almond milk or organic whole milk)
1/2 tsp ground black pepper
1/4 tsp sea salt
1 1/2 cups grated unpasteurized Gruyere cheese  (or your choice of cheese)


Directions:

1.  Heat olive oil in large skillet over medium heat.  Add onion and saute for 5 minutes.

2.  Add mushrooms, cover, and cook 3-4 minutes; stirring occasionally.  Stir in baby spinach and garlic; cover and cook 2-3 minutes or until spinach is wilted.

3.  Lightly whisk eggs in mixing bowl.  Whisk in coconut milk, pepper and salt.

4.  Sprinkle 1/4 cup grated cheese over the bottom of pastry shell.  Bake at 375 degrees for 2-3 minutes to melt cheese.

5.  Pour vegetable mixture in pie shell.  Sprinkle with half the remaining cheese.  Slowly pour in egg mixture, then top with the rest of the grated cheese.

6.  Bake for 40-45 minutes at 375 degrees until golden brown and slightly puffy.  Let cool 15 minutes and serve.